
Creating Your Own Space on Hugging Face: A Simple Step-by-Step Guide
Deploying ML models interactively is a breeze with Hugging Face Spaces. I’m sure that this guide will walk you through the process of preparing, uploading, and launching your machine learning model for sentiment analysis of movie reviews. Let’s get started!
What is Hugging Face and what are Spaces?

Hugging Face is an open-source community and platform designed for AI and machine learning.
Think of it as GitHub for the ML world, where you can host, build, and deploy machine learning applications with ease.
Spaces is Hugging Face’s hosting platform for deploying interactive machine learning applications.
With Spaces, users can:
- Showcase Models: Deploy and share live demos of their ML models.
- Interact with Apps: Build user-friendly interfaces using frameworks like Gradio or Streamlit.
- Collaborate and Share: Host public or private Spaces and collaborate with the community.
Overview of the Machine Learning Model
Before starting with the Spaces, lets understand about the ML model. I assume that you already have a Model ready to be deployed to the Hugging Face spaces. for this tutorial I’m using Naive Bayes classifier to analyze the sentiment of movie reviews. It is a simple Model that predicts whether a review expresses a positive or negative sentiment based on its text.
We’ll integrate it into a Hugging Face Space using Gradio, a user-friendly interface builder for machine learning applications.

Step 1: Set Up a Hugging Face Account and Create a New Space
- Create an Account
Head over to Hugging Face and sign up if you haven’t already. - Create a New Space

- Go to your profile and navigate to the “Spaces” tab.
- Click Create a new Space.
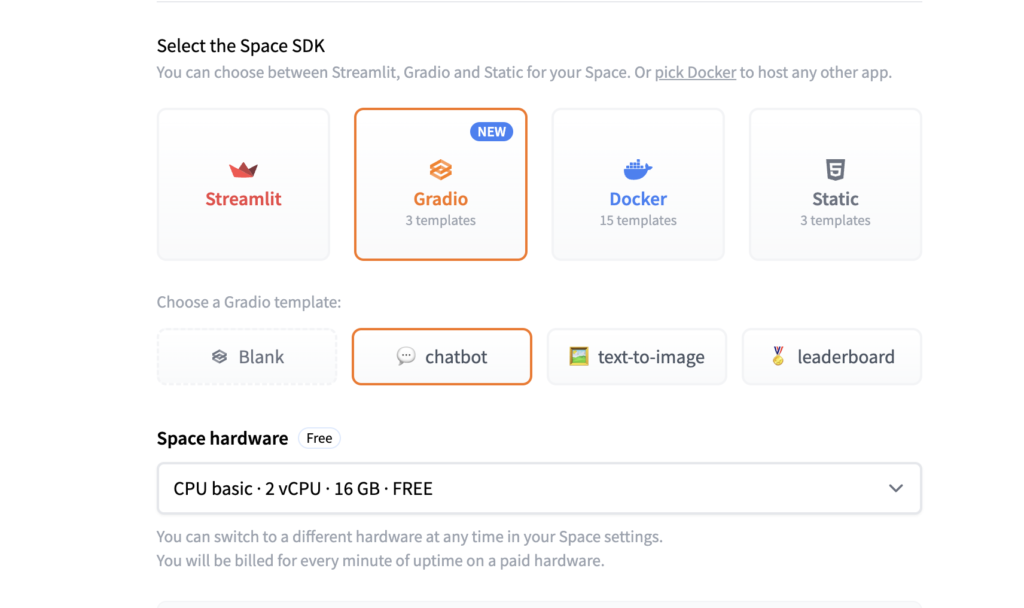
- Choose a template, such as Gradio or Streamlit, for your app.(This step really depends on your ML model, as I have a simple prediction model I’m using Chatbot. You are free to experiment about this.

- Name your Space and set its visibility to public or private.
Step 2: Prepare Your Project Structure
Before this step don’t forget to clone the project and make changes Locally.
Now you can Organize your project files following Accordingly with below Structure:
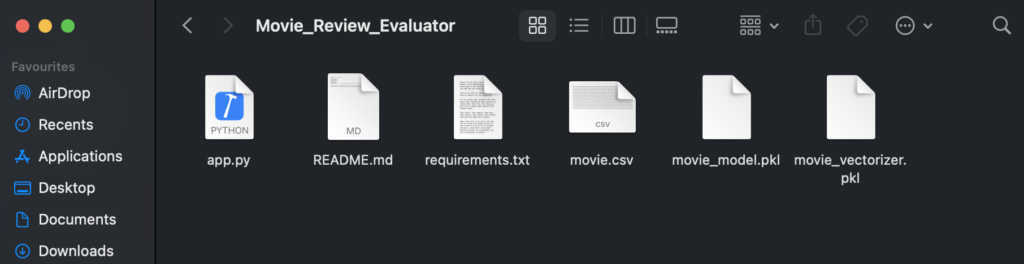
- app.py: Main script to run the app
- movie.csv: Dataset of movie reviews
- movie_model.pkl: Trained Naive Bayes model
- movie_vectorizer.pkl: TF-IDF vectorizer
- requirements.txt: Dependencies
- README.md: Project description and instructions (it is optional)
Step 3: Write the app.py File
This app.py file is core and it defines the behavior of your app. Below is the example of my current app.py of how you can build the app using Gradio again feel free to experiment.
import gradio as gr
import joblib
import nltk
import pandas as pd

# Download NLTK stopwords if needed
nltk.download('stopwords')

# Load pre-trained model and vectorizer
vectorizer = joblib.load("movie_vectorizer.pkl")
model = joblib.load("movie_model.pkl")

# Function to predict sentiment
def predict_sentiment(review):
    review_tfidf = vectorizer.transform([review])
    prediction = model.predict(review_tfidf)
    return 'Positive' if prediction[0] == 1 else 'Negative'

# Create Gradio interface
def create_interface():
    with gr.Blocks() as demo:
        gr.Markdown("## Movie Review Sentiment Analysis")
        with gr.Row():
            input_review = gr.Textbox(label="Enter a Movie Review", placeholder="Type your review here...")
            output_sentiment = gr.Textbox(label="Predicted Sentiment", interactive=False)
        button = gr.Button("Predict Sentiment")
        button.click(fn=predict_sentiment, inputs=input_review, outputs=output_sentiment)

    return demo

# Launch the app
interface = create_interface()
interface.launch()
- Model Loading: Loads the TF-IDF vectorizer and Naive Bayes model.
- Prediction Function: Uses the model to predict sentiment based on input.
- Gradio UI: Builds an interface with an input textbox and a button to get predictions.
Read here for more: https://www.gradio.app/guides/using-hugging-face-integrations
Step 4: Create the requirements.txt File
Here is my requirement file and your’s may differ, Hugging Face will install them automatically during deployment.
gradio
joblib
scikit-learn
nltk
pandas
Step 5: Push the code from local file to Spaces(Final Step)

Few steps to follow:
- First step is to use git add to add your files
- Then use git commit -m “your message” for adding a commit message
- Finally push your code git push
That’s It!!!
Congratulations! You’ve successfully deployed a model on Hugging Face Spaces.
Your interactive app is now accessible to users around the world.

Follow Me for More!
If you found this guide helpful and want to learn more about machine learning, AI, and other exciting tech topics, be sure to follow Byte Genius and me on LinkedIn for regular updates and insights!